This is now four of my first nine wedding invitation designs to win a Today's Best Award! And these are all from the first day, I think. Wow! Well, I knew they were lovely and I was just delighted with them!
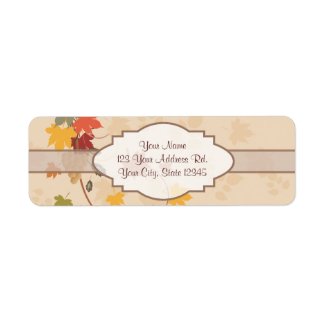
Once again, they chose the item with the broadest appeal/use, the address label.
Saturday, December 29, 2012
Friday, December 28, 2012
Not One, Not Two, but THREE Today's Best Awards!
A few days ago, I opened a new shop on Zazzle, Tannaidhe's Wedding Boutique, to focus on invitation/stationery sets and wedding-related gifts. In my initial rush of excitement, I managed to get nine designs up in just two days (I have a good template, and an invitation set only has about a dozen items.)
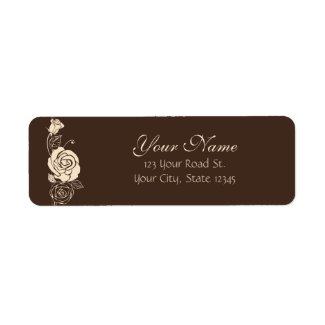
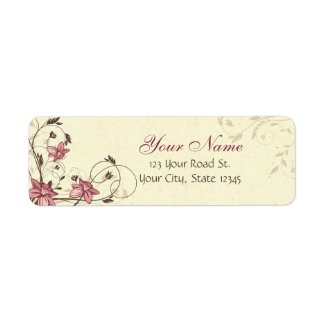
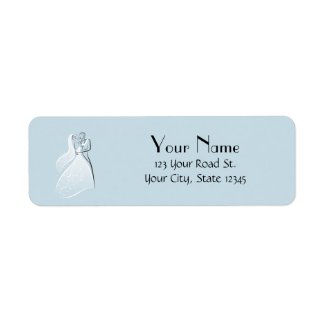
Well... this morning I woke up to a bunch of emails... as the title says, I got not one, not two, but three Today's Best Awards on Zazzle. Granted, they seldom translate to much more than an ego boost, but still! Three in one day, fully a third of the designs in that shop so far! I assume they chose the address labels out of the set, because they have the widest appeal; all except the dancing couple, you'd never really know they were wedding-related without seeing the rest of the set.
So, with no further ado, my three Zazzle TBA's:

Friday, December 7, 2012
Zazzle Postage update and sale!
For those who aren't aware, the USPS postage rates are going up! They will, going forward, be $0.46. For a limited time, order postage from Zazzle at the OLD price and receive the NEW postage rate!
Browse other gifts from Jennie on Zazzle.
Browse other gifts from Jennie on Zazzle.
Wednesday, November 28, 2012
Adorable Fingerless Gloves
I joined a gift exchange through Craftaholics Anonymous this year. After a number of questions with my exchange partner, I decided a pair of blue cotton fingerless gloves were the perfect gift (being a crafter's group, they have to be handmade).
So of course, I hit Ravelry, and found this adorable pattern for mildly lacy crochet wristwarmers. Despite a few false starts to find the right size (I had to go up to a J/6mm hook to make them large enough), and even only working a few minutes at a time, I had the pair of adorable wristers finished in a little over a day!
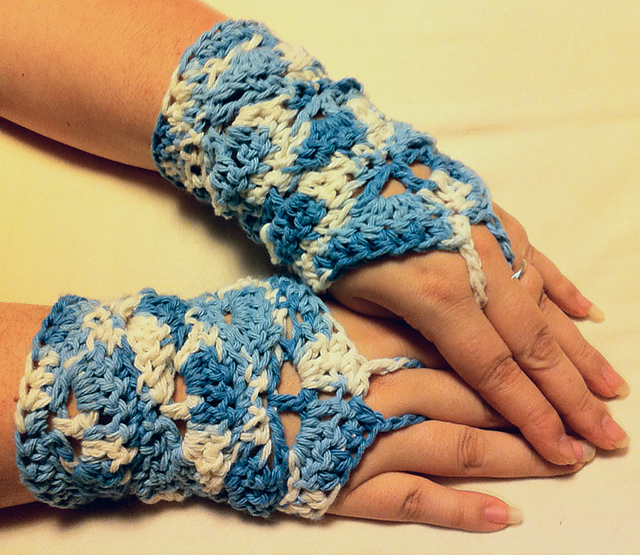
I loved the pattern so much, I decided to make a pair for my sister for Christmas. My mom got this lovely yarn for me; cotton, natural colored with speckles of peach, moss and brown. It took less than one 95 yard skein!

I may have to make a few more pairs for people! An excellent addition to the Goody Bags that will be my Christmas gift for most folks this year. And the pattern has a non-lacy masculine counterpart, too!
So of course, I hit Ravelry, and found this adorable pattern for mildly lacy crochet wristwarmers. Despite a few false starts to find the right size (I had to go up to a J/6mm hook to make them large enough), and even only working a few minutes at a time, I had the pair of adorable wristers finished in a little over a day!
I loved the pattern so much, I decided to make a pair for my sister for Christmas. My mom got this lovely yarn for me; cotton, natural colored with speckles of peach, moss and brown. It took less than one 95 yard skein!
I may have to make a few more pairs for people! An excellent addition to the Goody Bags that will be my Christmas gift for most folks this year. And the pattern has a non-lacy masculine counterpart, too!
Monday, November 26, 2012
Cyber Monday Sale on Zazzle
It's here... Cyber Monday. Sales galore! And Zazzle is no exception. Just use the code 60ZCYBERSALE at checkout to cash in on these AMAZING deals!
60% Off Wrapped Canvases, Posters & Photo Prints
50% Off Cards, Invites, Postcards, Photocards & Ornaments
30% Off Mugs & Calendars
20% Off T-Shirts, Messenger Bags, Laptop Bags & Tote Bags
$10 Off Cases & Sleeves
And, if what you want isn't listed there...
15% Off Everything Else!
In addition, I have a few $5 off coupons for orders of $25 or more, which I would be happy to give out to those wanting to order from my shop.
View more at my store on Zazzle.
Tuesday, November 20, 2012
Today's Best Award
Although I am not as enamored of the Today's Best Award on Zazzle as I once was – for one thing, no one but other shopkeepers seem to know they are there, and for another, the designs picked are sometimes questionable at best – I really love this design and think it quite deserving of the award.
As with most of my Zazzle designs, it is, of course, available on dozens and dozens of other items as well!
As with most of my Zazzle designs, it is, of course, available on dozens and dozens of other items as well!
Friday, November 9, 2012
Zazzle Extended Eight Hour Friday Sale
This week, Zazzle's usual Friday Four Hour Sale has been extended to eight hours! Until 8 pm pacific time tonight (November 9th). And it's a great sale selection, too – 50% Off Mugs, Canvases & Mousepads! Use code MYPHOTOGIFTS at checkout.
See more of my designs available on Zazzle.
See more of my designs available on Zazzle.
Sunday, November 4, 2012
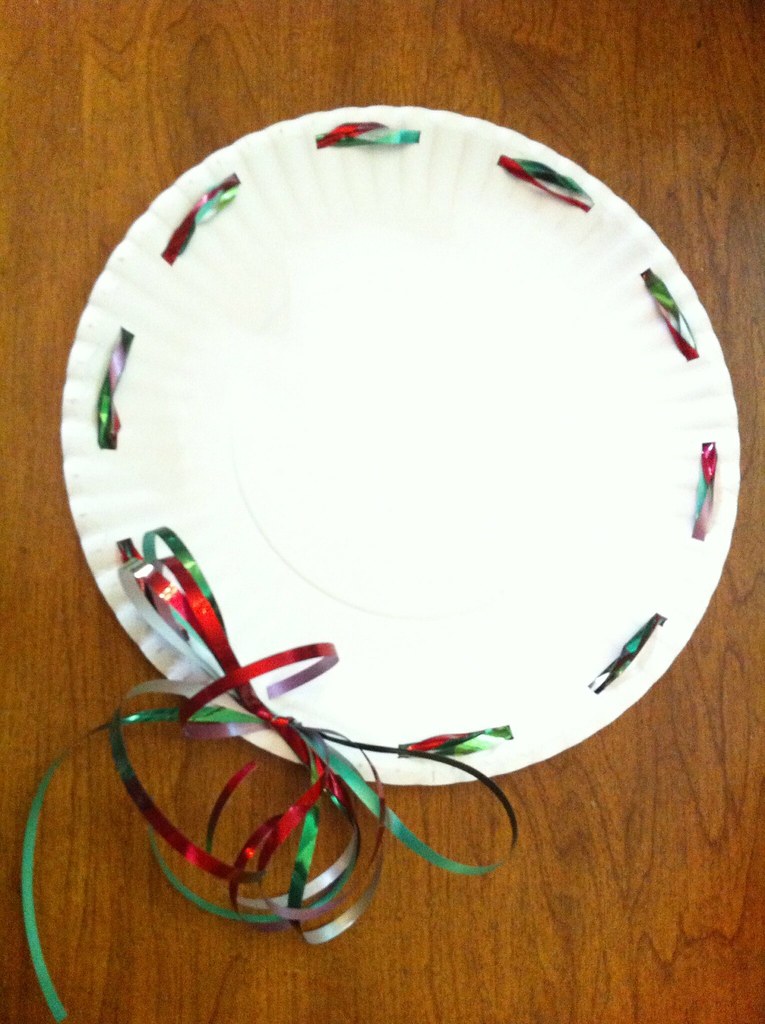
How-To: Easy Inexpensive Gift Plates
There are lots of easy, inexpensive treats available to make as Christmas gifts, like Super Simple No Fail Fudge.
However, that leaves the question of how to package your goodies to give them away; if you have to buy a tin or plate for every gift, this is often the most expensive part of the gift.
Not anymore!
This brilliant idea costs pennies, and allows you to adjust for any gift-giving occasion, all with supplies you probably already have in the house.
1-3 paper plates (you can even get cute ones appropriate to the occasion, or decorate them yourself)
Approx. 2 feet of ribbon
Hole punch or Xacto knife
Punch or cut a holes a quarter inch or so from the edge of your plate, about an inch to an inch and a half apart. On the plate I used, I skipped two 'ripples' in between each hole (the last one was on the next ripple to the first, but that was fine as the bow goes there.) If you will be heavily loading the plate, use two or even three together and cut through all of them at the same time so that they line up properly.

String your ribbon through the holes, alternating top and bottom. This will be easier if you pull enough through the first hole to make it all the way around and tie a bow at the end, instead of trying to pull it as you need it.

Tie a pretty bow, cut off excess ribbon, and you're done! If your gift will need to travel, wrap with cellophane and use the same ribbon to tie it shut.
However, that leaves the question of how to package your goodies to give them away; if you have to buy a tin or plate for every gift, this is often the most expensive part of the gift.
Not anymore!
This brilliant idea costs pennies, and allows you to adjust for any gift-giving occasion, all with supplies you probably already have in the house.
What You Will Need
1-3 paper plates (you can even get cute ones appropriate to the occasion, or decorate them yourself)
Approx. 2 feet of ribbon
Hole punch or Xacto knife
How To Assemble
Punch or cut a holes a quarter inch or so from the edge of your plate, about an inch to an inch and a half apart. On the plate I used, I skipped two 'ripples' in between each hole (the last one was on the next ripple to the first, but that was fine as the bow goes there.) If you will be heavily loading the plate, use two or even three together and cut through all of them at the same time so that they line up properly.
String your ribbon through the holes, alternating top and bottom. This will be easier if you pull enough through the first hole to make it all the way around and tie a bow at the end, instead of trying to pull it as you need it.
Tie a pretty bow, cut off excess ribbon, and you're done! If your gift will need to travel, wrap with cellophane and use the same ribbon to tie it shut.
Friday, November 2, 2012
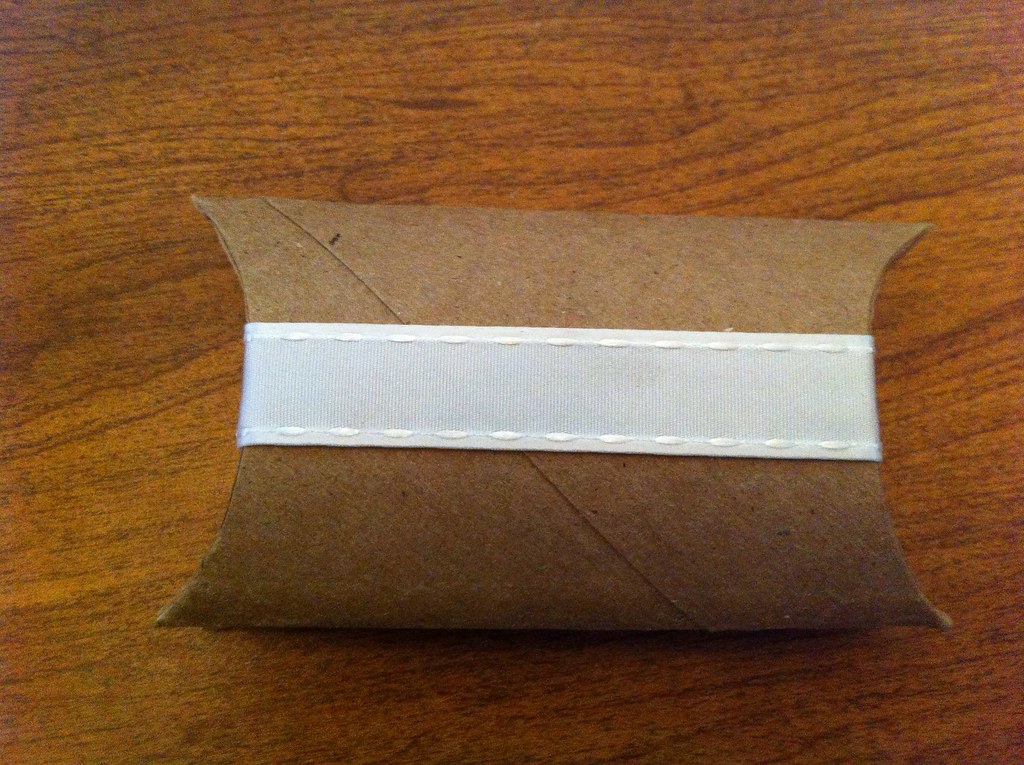
How-To: Upcycled Pillow Boxes
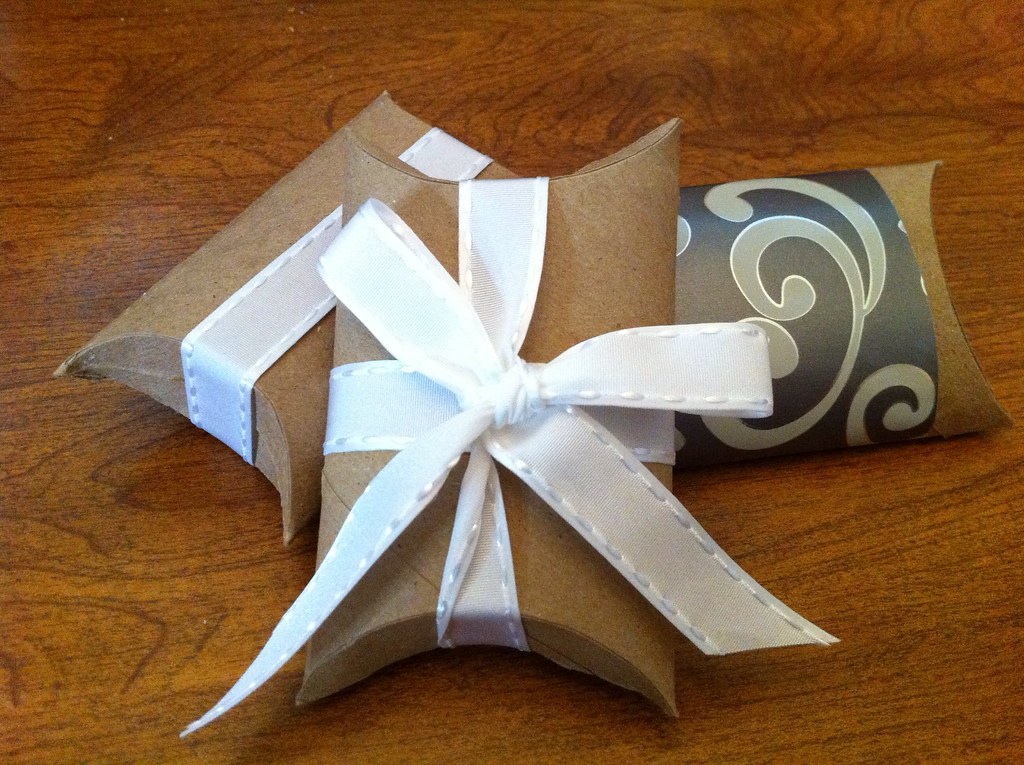
I got the inspiration for these adorable little boxes on, I admit, Pinterest. However, while it said what they were, they included no instructions and it took me a while to figure out exactly how to do it. So, I decided to take the 'figure out' time out of it for future readers.
Here, then, is a step-by-step tutorial to go from – yes – toilet paper rolls, upcycled to adorable pillow boxes for small gifts. You could follow the same basic instructions with paper towel rolls, either for long boxes, or cut into pieces for 'square' boxes, or any size in between.
All you absolutely need is this:
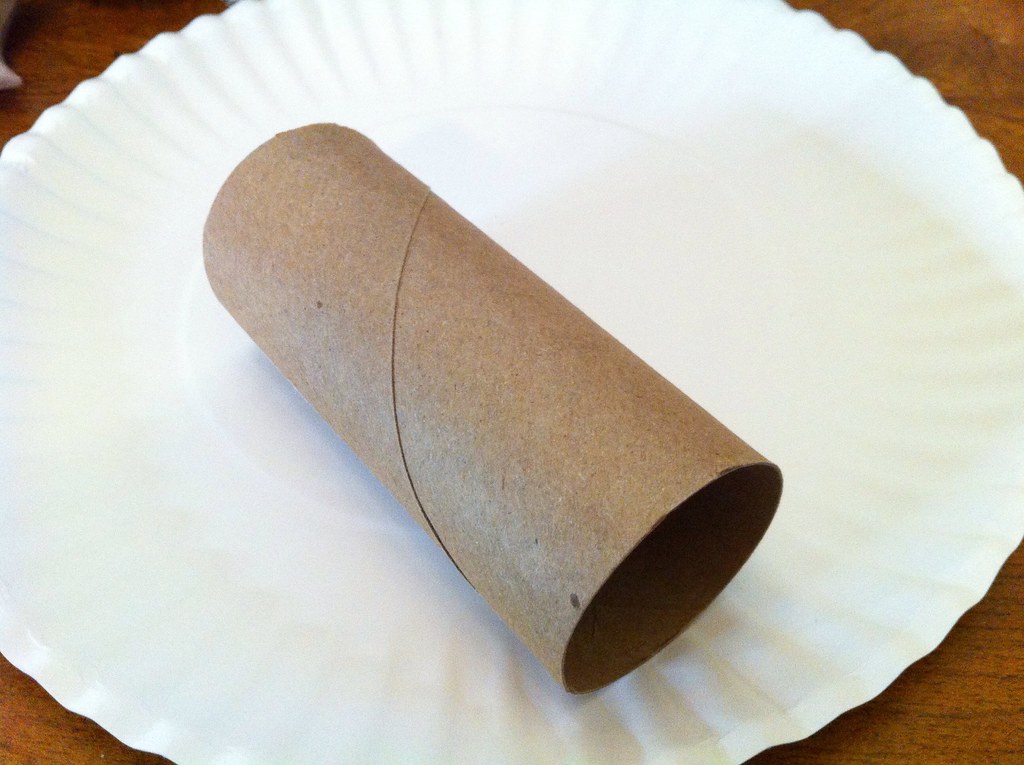
However, I I found it was much easier, and the finished product much neater, to lightly score the tubes with an exacto knife. After much searching around the house for 'the perfect circle', I found that the spool of ribbon I would be using to decorate the box with when it was finished, was the perfect size.
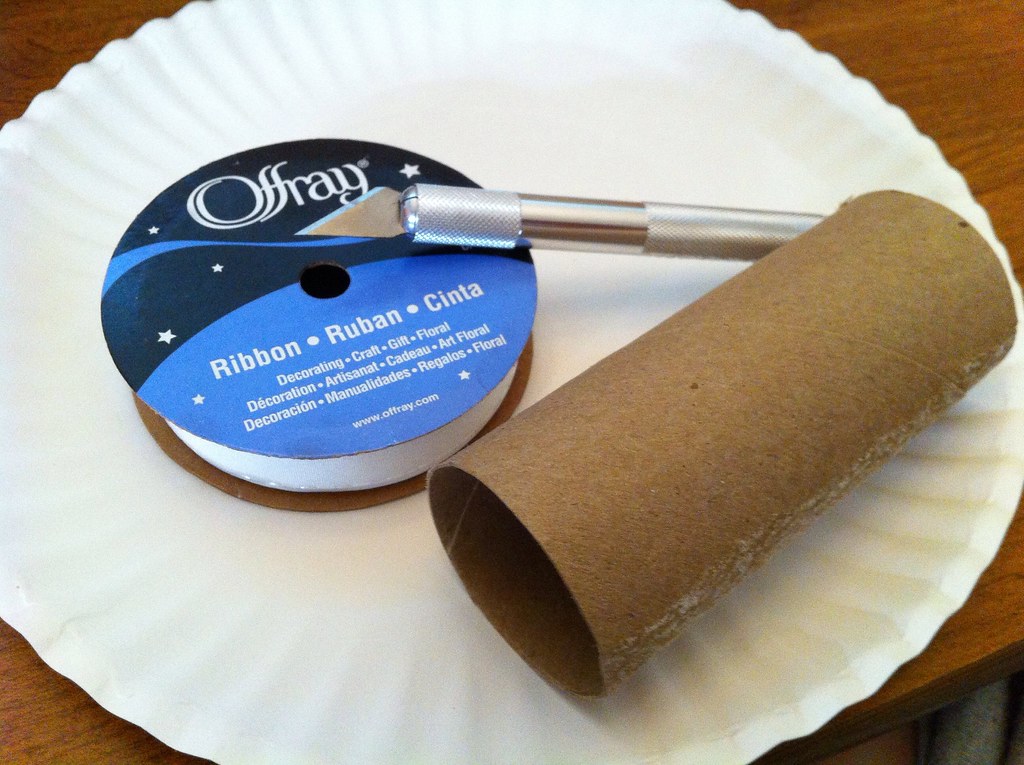
So, gather your materials. Easy.
Now, squish your roll flat, but don't hard-crease the edges, so that it will pop back up partway.
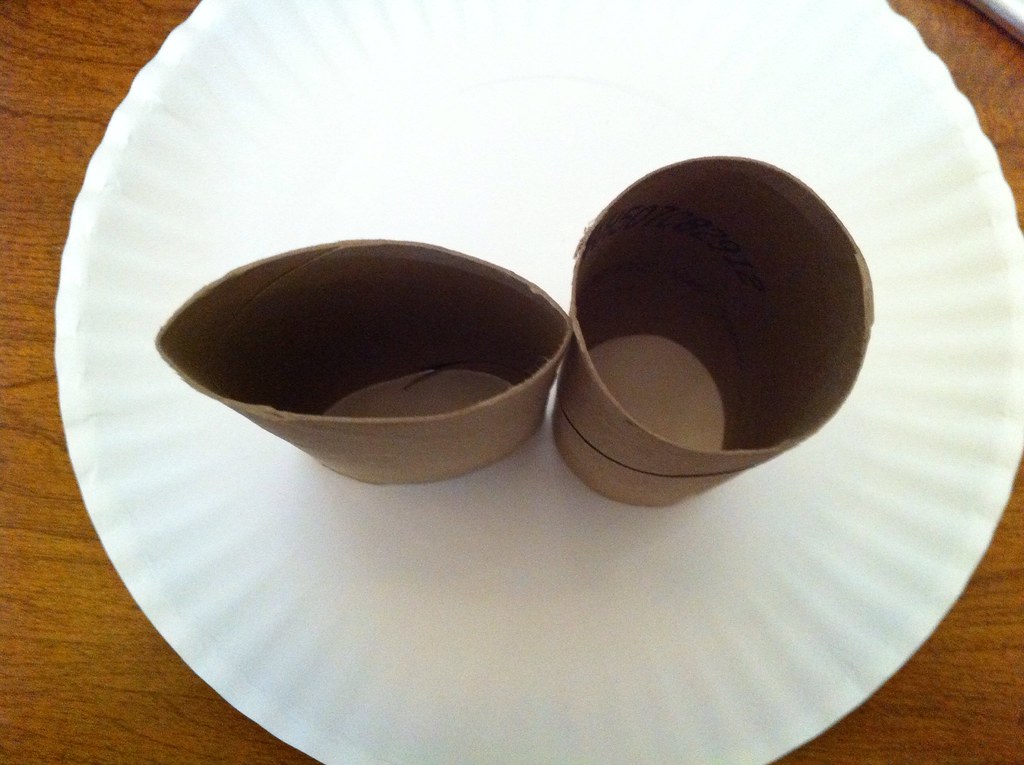
Line your circle guide at one end of the roll, so that it goes from corner to corner with the tube squished. Lightly score around the circle; keep in mind you aren't trying to cut anything, just make it easier to fold neatly.


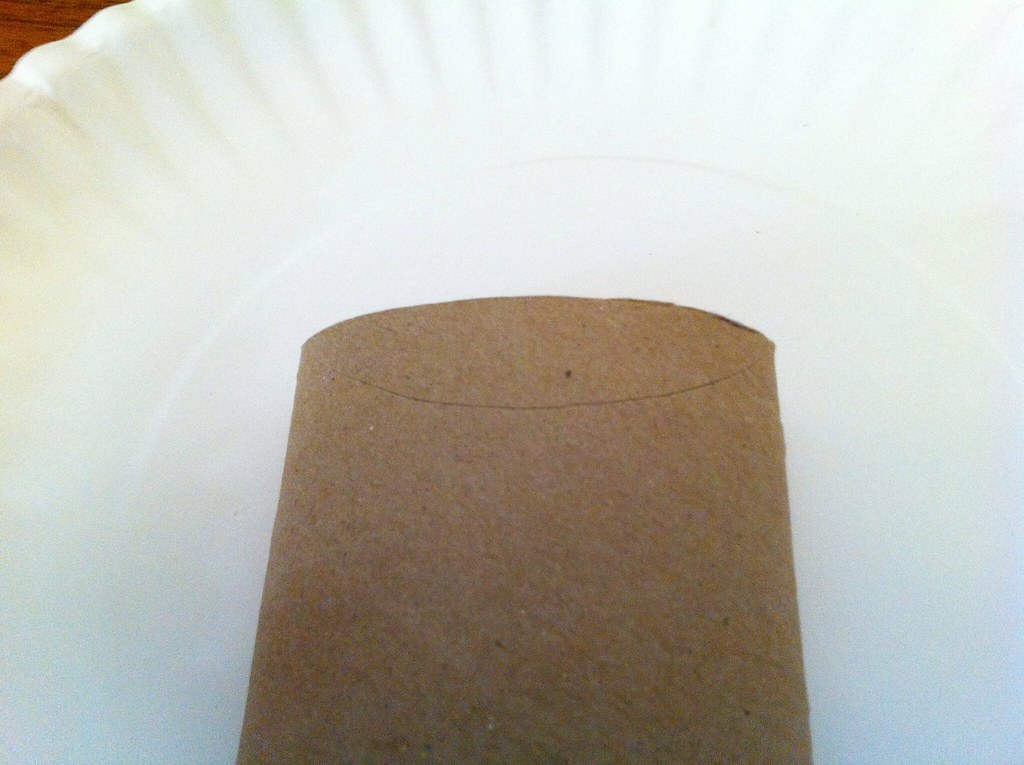
Repeat at both ends, front and back.
Bet you can't guess the next step, huh? Oh, wait, right... So, fold down the flap. If you have an 'ugly' side to the box, such as a glue strip, fold that side first, so that it will end up the bottom. Repeat for all four flaps, first 'front' then 'back'. You may need to squish and wiggle the little pointy corners a bit to get them lined up and shaped just right.
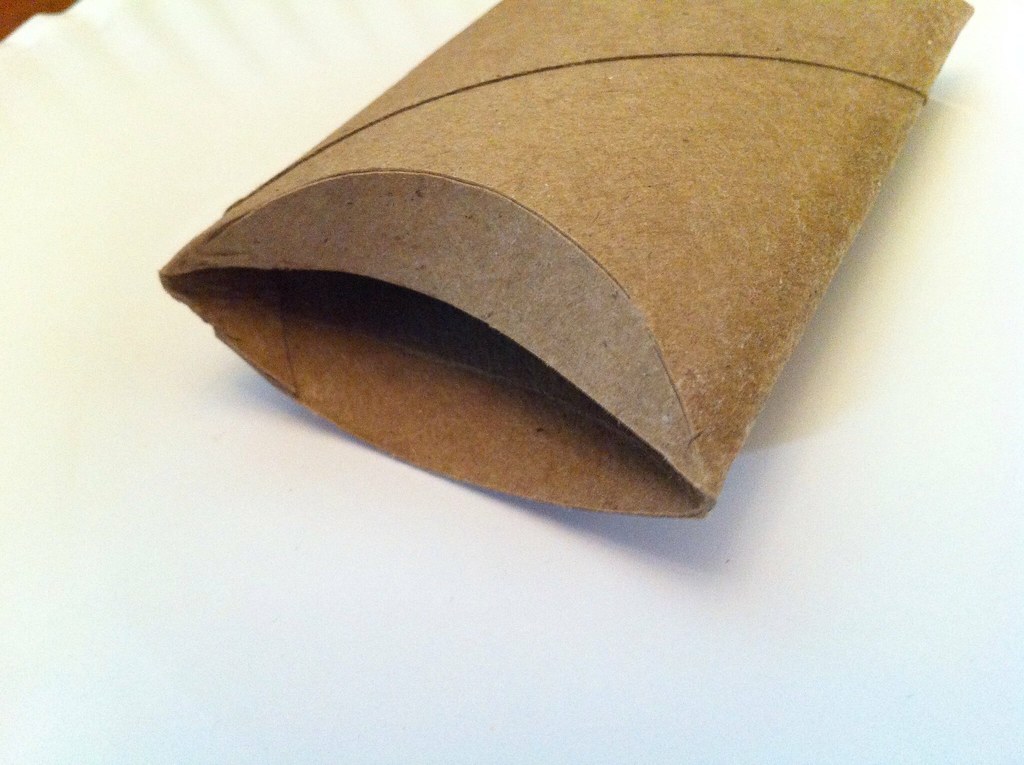

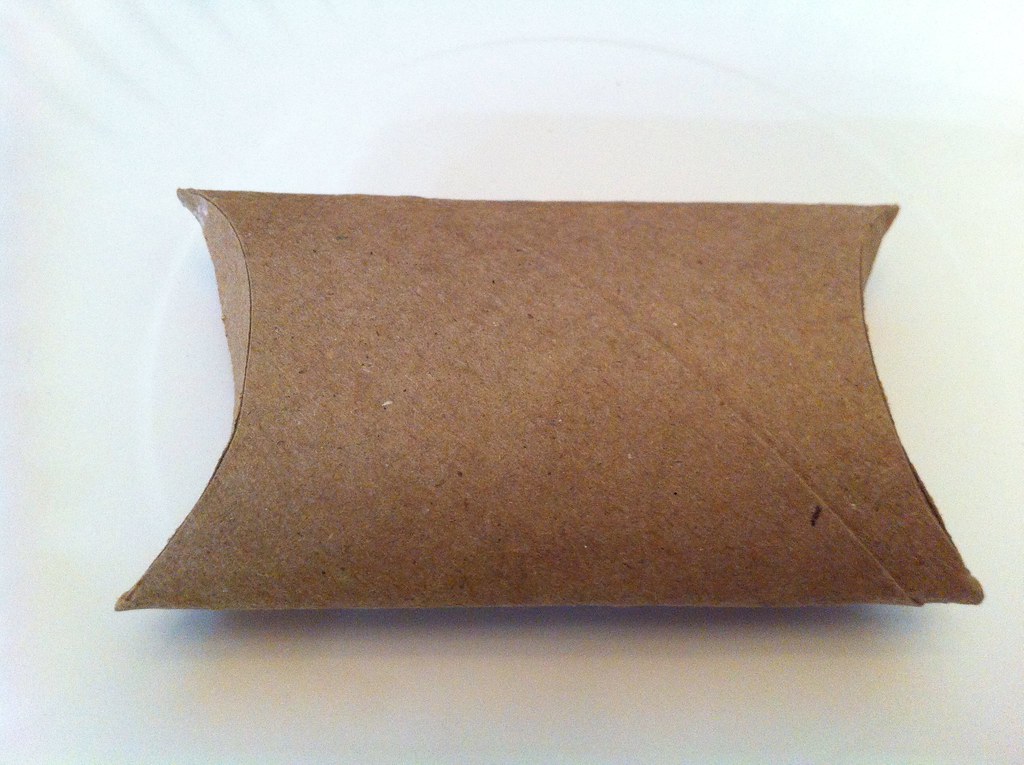
That's it! That's your basic pillow box. Decorate them, with markers or stamps or glitter.... wrap them with a little strip of wrapping paper (the huge benefit to this is you can just do it in the center, making the box complete with decoration reusable!), or just some ribbon, or a pretty bow... get creative!
Saturday, October 27, 2012
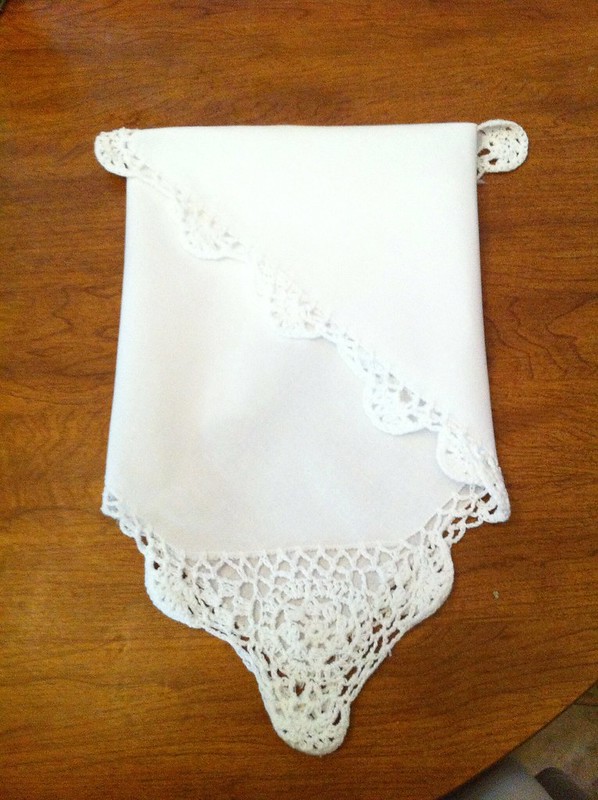
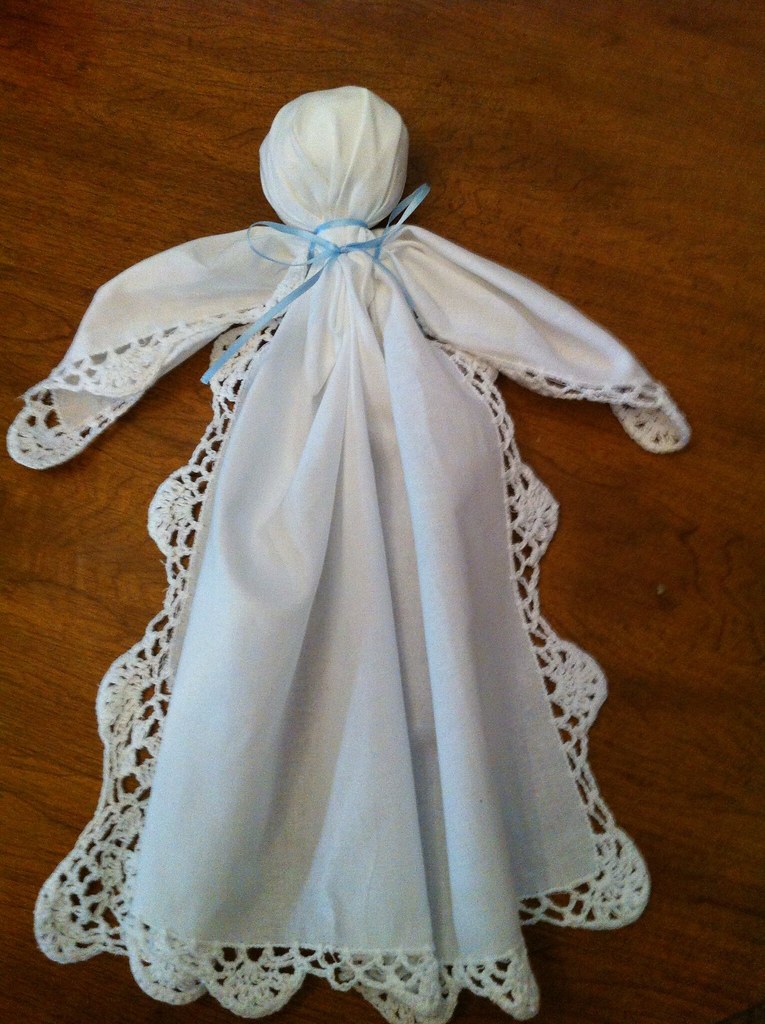
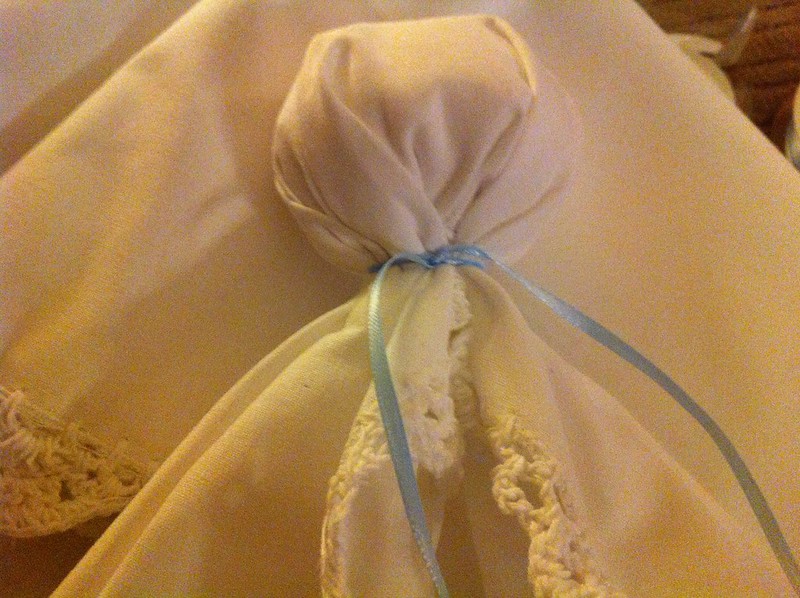
How To: Civil War Handkerchief Dolls
My grandmother-in-law gave me one of these adorable little dolls a year or so ago, and this year has asked me to make some of them for her, for Christmas gifts. They are very adorable just on their own, and all the more so because of their fascinating history.


Arrange the ball near the top edge of the handkerchief, so that you can fold the remaining cloth over it completely with a half inch or so extra below the ball, so as to get tied down at the neck.
Carefully wrap the remaining handkerchief down around the ball, tugging gently as necessary to get it even, but do not pull it down too tight.
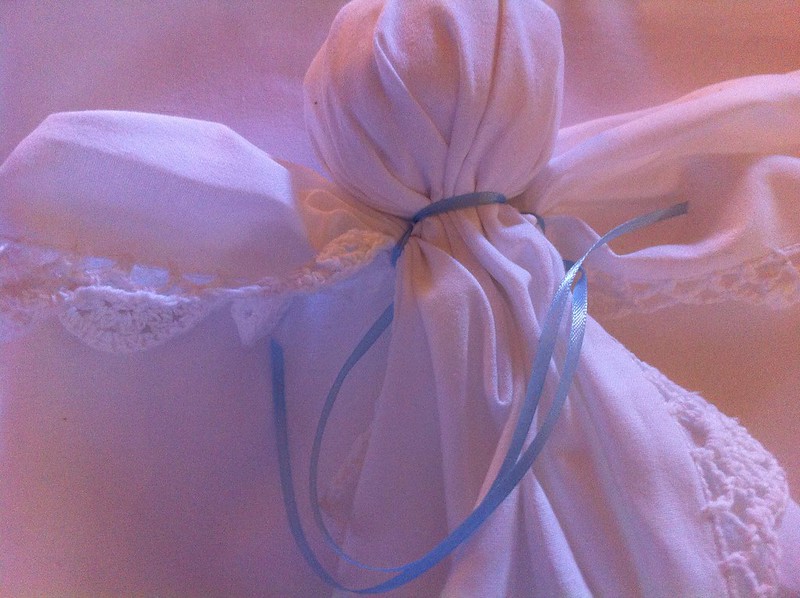
Holding the handkerchief in place with one hand, wrap the ribbon around the 'neck' under the ball carefully, in the middle of the ribbon, and tie securely in place.
Pull the short corners out straight, and tuck in the long side to just under the neck, forming the arm.

Using one side of the ribbon, wrap it around the arm piece, and tie in the back. Be sure to snug it down tightly, then repeat on the other side.
Slip ribbons snugly under the arms to the front.
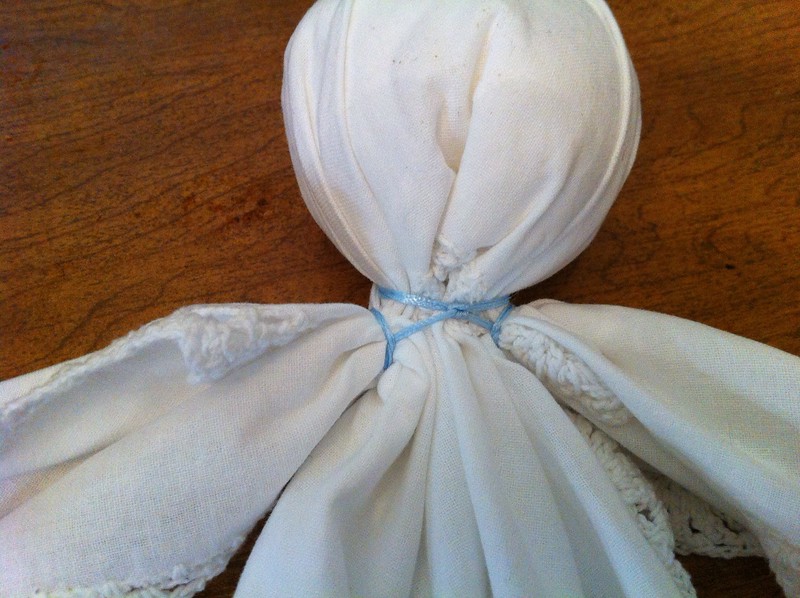
Tie ribbons securely in the front, then in a nice bow. If necessary (as it is below), carefully tug the handkerchief to lay neatly between the ribbons. You are finished!
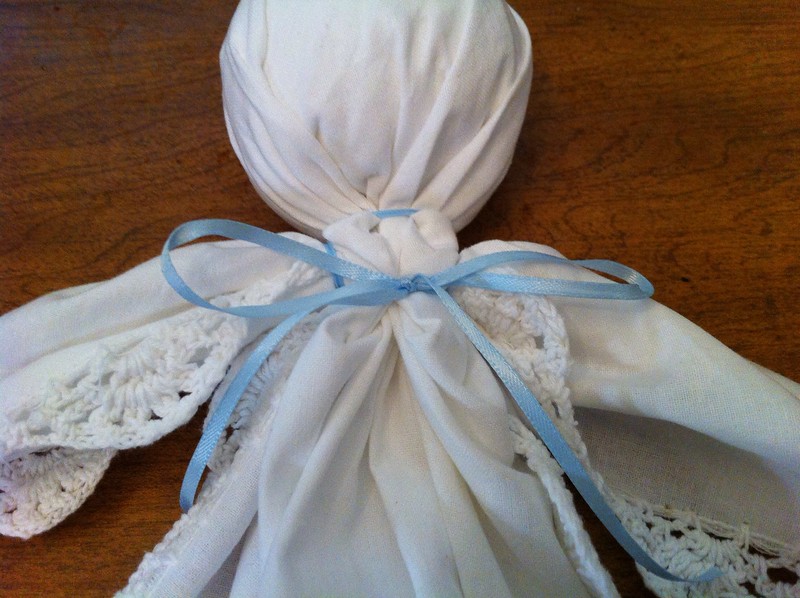
Feel free to print out the card below if giving the doll as a gift, to share the enchanting history of these simple but ingenious dolls.

During the Civil War, there was little money to be found for food, let alone toys, so women made dolls for the children out of handkerchiefs. If the handkerchief had belonged to a loved one who had gone off to war, the doll helped to ease the pain of separation.
Also known as church dolls, they provided a quiet toy for a child's amusement, and were silent if dropped.
Materials:
- 1 handkerchief or thin napkin
- 1 generous handful of stuffing for the head
- 1 1/2' of thin satin ribbon (approx.)
- 1 paper towel
- tape
Instructions:
Take the stuffing for the head and paper towel. Roll the stuffing loosely in the paper towel, and tape into a 'tube', then fold down the sides and tape together, then tape down two of the corners a bit, to make a roughly head-shaped ball. Although this is not strictly necessary, I found it almost impossible to get the head formed right without doing this first.Arrange the ball near the top edge of the handkerchief, so that you can fold the remaining cloth over it completely with a half inch or so extra below the ball, so as to get tied down at the neck.
Carefully wrap the remaining handkerchief down around the ball, tugging gently as necessary to get it even, but do not pull it down too tight.
Holding the handkerchief in place with one hand, wrap the ribbon around the 'neck' under the ball carefully, in the middle of the ribbon, and tie securely in place.
Pull the short corners out straight, and tuck in the long side to just under the neck, forming the arm.
Using one side of the ribbon, wrap it around the arm piece, and tie in the back. Be sure to snug it down tightly, then repeat on the other side.
Slip ribbons snugly under the arms to the front.
Tie ribbons securely in the front, then in a nice bow. If necessary (as it is below), carefully tug the handkerchief to lay neatly between the ribbons. You are finished!
Feel free to print out the card below if giving the doll as a gift, to share the enchanting history of these simple but ingenious dolls.

Friday, October 26, 2012
Zazzle Four Hour Sale
The Friday Four Hour Sale on Zazzle this week is really fabulous! 50% off phone cases and all bags! Enter code CASESANDBAGS at checkout, good until 4 pm PST today (Oct. 26). I just knocked out a good portion of my Christmas list thanks to this fabulous sale. Keep in mind that there are half a dozen styles of bags you can get the images on, if you like a design but not a particular bag style.
Thursday, October 25, 2012
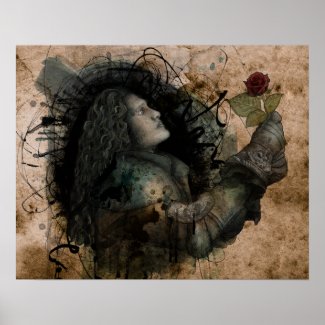
Grunge Portrait Addendum
Most of the 'point' of my last post was to share the awesome tutorial by tigers-stock on DeviantArt, then I forgot to include the link! >.< I have now fixed that for any future readers, and for those who missed it the first time around that are interested, it can be found here: Tigers-Stock's Grunge Portrait Tutorial
Hope you enjoy it!
Hope you enjoy it!
Wednesday, October 24, 2012
Amazed with my own work!
The impetus to finally start this blog – been meaning to for a while but never got around to it – was when I found the most amazing tutorial on making portraits in the "grunge" style. I got Adobe Photoshop finally, too, just to try it out... and I am in love. With photoshop, with my new artwork. I used to see people talk about taking 20 or more hours to create an image on the computer, and I just couldn't figure it out... how could you find 20 hours worth of work to do on a computer? how could you stay interested and not just lose track? But... well... the first one took about 15 hours, and the second, the knight, took about 20-22.
Take a look! And if either strikes your fancy, they are available on dozens of items over at my Zazzle store.
Take a look! And if either strikes your fancy, they are available on dozens of items over at my Zazzle store.

Welcome!
Welcome to It's So Purdy! I will soon, hopefully, be filling you in on various art and crafts, both that I have done, and want to do, showing off and instructional how-to's, or just pictures of 'wow' crafts.
Please be patient as we get all set up!
In the meantime, go take a peek at my Zazzle store!
Please be patient as we get all set up!
In the meantime, go take a peek at my Zazzle store!
Subscribe to:
Posts (Atom)