Friday, October 4, 2013

Crochet Finger Protector

For some time now, the biggest obstacle to increasing the amount and speed with which I crochet has been limited by one factor: I happen to like having skin on my left-hand pointer finger, where the yarn loops over.  I imagine most anyone who crochets or knits can sympathize; the shiny groove of skin that itches or stings or some maddening combination of the two.

Last night, I came up with the idea of using a piece of plastic (a former bottle safety seal) to guard the skin there.  But after a little while, I realized that a single-finger 'glove' would do the job perfectly.  Hence, the Crochet Finger Protector was born!


I am now offering the pattern in my Ravelry store here!


Sunday, June 23, 2013

Coffee Mugs for Fun and Laughs

That's right! My latest series of designs on Zazzle has been Coffee Mugs! Most of them are of a humorous nature . . . jokes, puns, funny quotes and more. I have quite a few posted already, and I have dozens of ideas still to come. One of them is even swiftly on its way to becoming my best selling item!

Most of the designs are offered not only on all the mugs Zazzle has to offer, but t-shirts and a few other gift items as well, perfect for any caffeine addict! So be sure to come and check out the entire line!


See these and many more Coffee Mugs at Tannaidhe's Designs on Zazzle!

Sunday, June 9, 2013

Diversifying is Fun! (Not!)

Yep, I'm still here.

The last week has been really rough for me, culminating in a very disturbing announcement by Zazzle on Thursday, and while it's not exactly a shocking surprise, it will be cutting most of their good designers by a third or more of their income, including me. I am lucky at least in that, while it is certainly a major bummer, I was not yet to the point of paying any bills with my Zazzle income . . . this will just delay the day I can do that by a bit. Many were much harder hit, and left wondering how they will pay mortgages next month.

One thing it has done to me, however, is finally made me listen to the advice of so many other designers who were devastated after being CafePressed back in '08-'09 . . . diversify! Don't keep all your eggs in one basket, or in this case, all your designs in one POD (Print On Demand stores). I liked being able to feel like I could trust Zazzle to take care of its designers, to help me flourish with them . . . but, perhaps, this little wake up call will end up being a benefit to my financial bottom line after all. Zazzle has the best quality and range of products and best customer service of any of the PODs, but there is plenty of market for lower-end products, or niche product lines, too!

As such, I'm working to get my CafePress store in working order again (had some trouble back in December with it getting hacked, and it's been a nightmare trying to get it sorted out), and I've already signed up for two new smaller PODs, and considering several others.


My work can now be found in brand new galleries on Society6 and Skreened! Both of these stores have limited product lines (Society6 is focused on art prints, while Skreened is focused on shirts), but I have heard good things about the quality from each.


Tannaidhe's Designs on Society6


Tannaidhe's Designs on Skreened


Tuesday, May 28, 2013

Yellow Roses Split Monogram Design

This is, without contest, my favorite design in some time that I've made on Zazzle. While I love most of my work, obviously – if I didn't, I wouldn't post it – somehow this style just came together perfectly; every detail works in flawless synergy with every other. From the simple yet elegantly dignified customizable monogram center seal with its floral scrollwork accents, to the textured ribbon divider, and of course the vintage style earthtone yellow roses with their soft moss green leaves all on a warm brown background.

I am of course continuing on to my next design, and hundreds more to follow no doubt... but it will be a while before I top this one, I'm sure.


(These small images to not do the design justice; click through to see the full-size designs!)

Gold Yellow Roses on Brown with Monogram

Blue and Cream Roses Split Monogram Design

The second in my split floral patterns with customizable monogram - Blue and Cream Roses!  Featuring elegant vintage style blue rose blossoms alongside smaller flowers, over a solid baby blue field, divided by a blue ribbon and a retro style monogram seal.


See more Blue and Cream Roses with Monogram Products
At Tannaidhe's Designs on Zazzle.com!


Sunday, May 26, 2013

Cherry Blossom on Mauve with Customizable Lace Monogram

This is the first design in a new subsection of my Split Monogram Designs.  These will be featuring a lower split, to better showcase the more decorative floral designs in the upper section.  With a reworked, more detailed ribbon divider, individually selected decorative monogram seals and fonts to complement each design, these designs are definitely the next step up from my basic monogram patterns to date.  All in all, these new offerings will be elegant and sophisticated.

See more designs by Tannaidhe on Zazzle.com

Saturday, May 25, 2013

How to Deep Clean a Nasty Area Rug

Ever had an area rug in a high-traffic area that just got really icky nasty dirty? Yeah, me too. Vacuuming obviously had no effect to being dingy and dirty and stinky... I even got a steam cleaner, and while that helped, it was only better in relation to how bad it had been... it was by no means even close to clean.

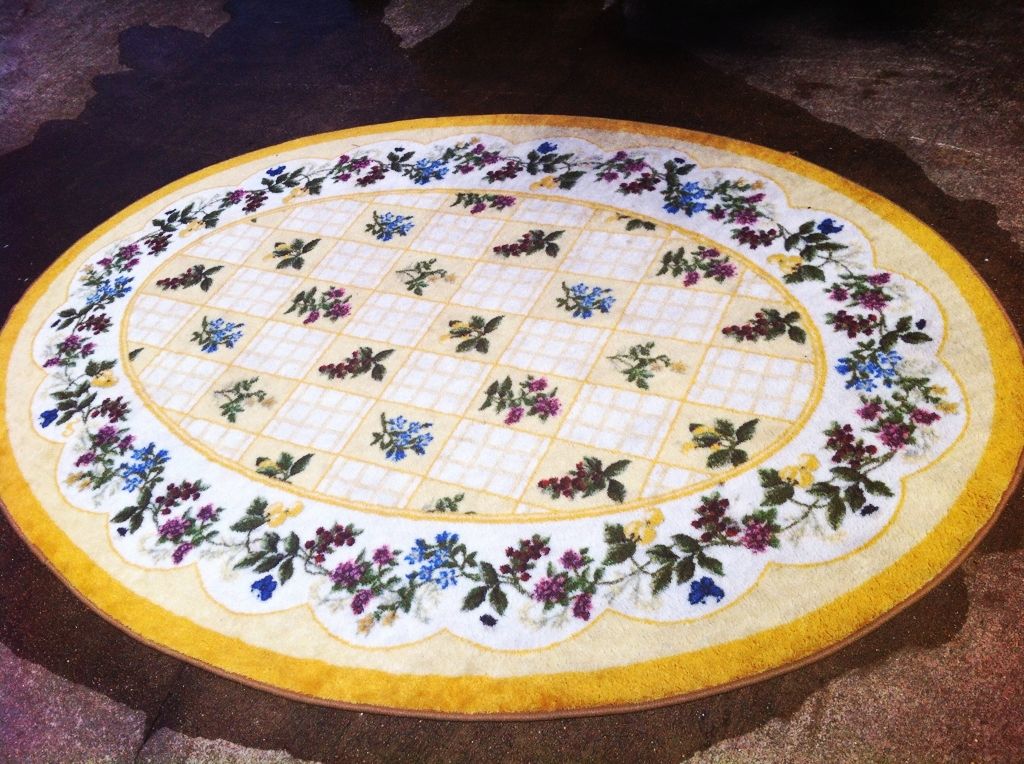
 Clearly, I had to get drastic. Luckily, I knew what I had to do, and I shall share the plan of attack - and my results - with you. It really, honestly looks like a whole new rug, except for one little section that is still slightly greyish, but only slightly. (And if I would get down on my hands and knees and really attack it with a brush, I could probably get it all sparkling again, but I decided I'd rather live with a slight grey patch rather than the pain should I kneel and bend over for that long...)

Materials Needed

  • 1 nasty, dirty rug
  • garden hose with pressure nozzle (I have a great one I got at Home Depot for about $7, that has about ten different settings, including a pressure jet)
  • clean area outside large enough for your rug (I pressure-hose cleaned out our open garage)
  • 1-3 Tbs laundry detergent
  • 1-3 Tbs washing soda (like baking soda, but stronger)
  • 1/3-1 tsp dishwashing liquid (Dawn, etc.)
  • 1/2-1 gallon container, preferably one that can be made to only pour a small amount at a time (I used a 1-gallon pitcher with the lid set to only expose only a single slit of the ice setting; a watering can with sprinkle head would work beautifully as well)
  • stiff bristled broom or scrub brush (optional, helps if you have really nasty spots) 
  • equipment to dry the rug in some manner (hanging, vacuum suction, etc.)

Cleaning the Rug

Step One

Take the rug outside, obviously.  Lay it out upside down.  (This is important, as it allows you to get the dirt that's compacted over the years at the bottom of the rug/fibers to get washed away.) 
Get your hose and wet it down thoroughly, then go over it slowly with the pressure nozzle, trying to cover every inch of it.  I found it helpful to slowly work the stream back and forth in about six inch waves, each moving up about the width of the stream of water across the rug, paying extra attention to visibly nasty spots.  Did I mention you should do this slowly?  You really want to pound the daylights out of every bit of it, this is mostly what gets the dirt out, and you want to get as much of it out as you can before adding the cleaners, so that they can be more effective.  It would take me two or three seconds to make each six inch pass.

Step Two

Mix the laundry detergent, washing soda, and dishwashing liquid in the container, and top off with hot water.  Scale the amount you use depending on size and general nastiness of your rug.
Distribute evenly over your rug.  I found it easiest to accomplish this by pouring a thin stream, then shaking the pitcher back and forth to make it 'sprinkle'. 

Step Three

Go inside and get something cold to drink.  No, seriously, this is a long process and you'll need the hydration!  Also, you should let it soak for at least 15 minutes, or up to about an hour, before continuing.

Step Four

Repeat the pressure washing procedure from step one.  Try to hit every single fiber for a second or two at least. 

Step Five

Flip your rug over (this sounds much easier than it is, you will swear it has been transmuted from yarn to lead).  It will look 
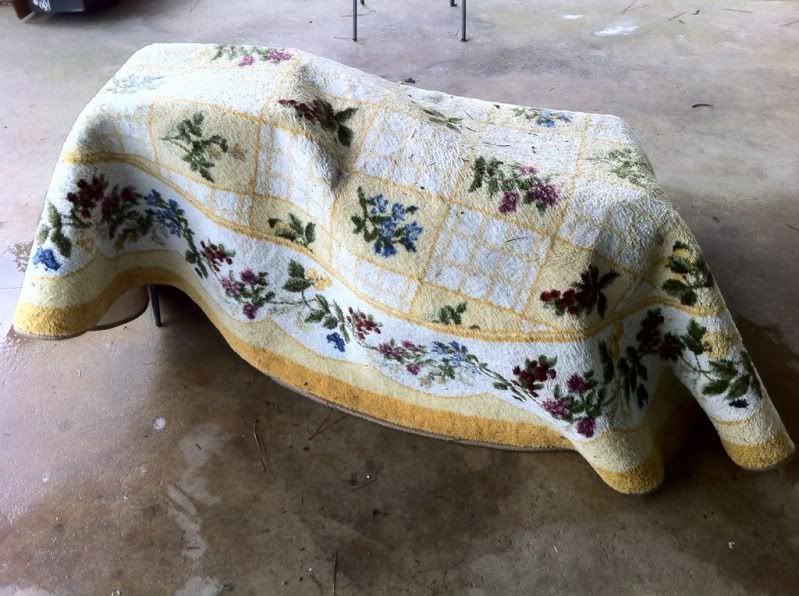
much nastier than it did before you started.  Don't panic!  This is normal.  It means your deep cleaning is working and all the nasty that was compacted at the base of the fibers has released.
Repeat the pressure washing procedure again (yes, again).  This is when you will see the drastic, dramatic change!


If your rug is really nasty, or has stubborn spots like mine, you may need to repeat steps two to five on the front side.  Use a stiff bristled broom or scrub brush on really stubborn stains after applying the cleaning solution.

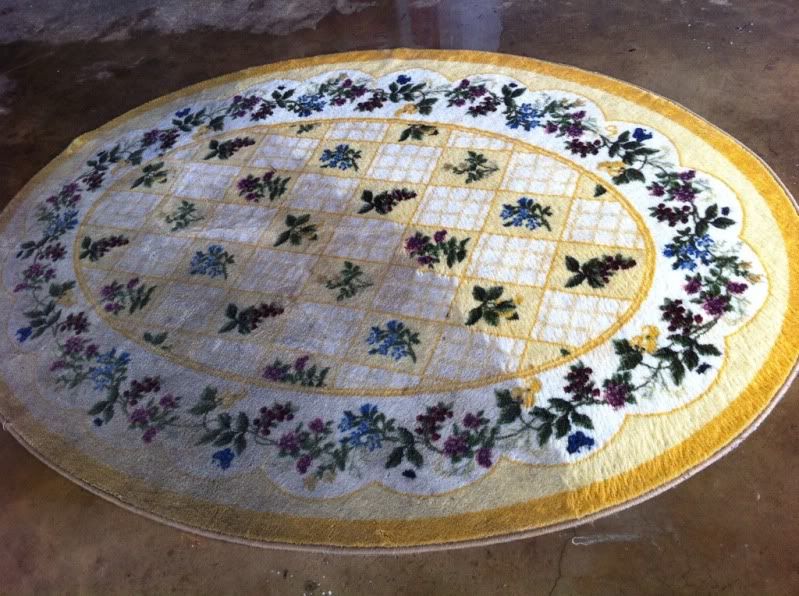
You can see the still-dingy section on the top side in this image, that I went back and cleaned a second time.

Step Six

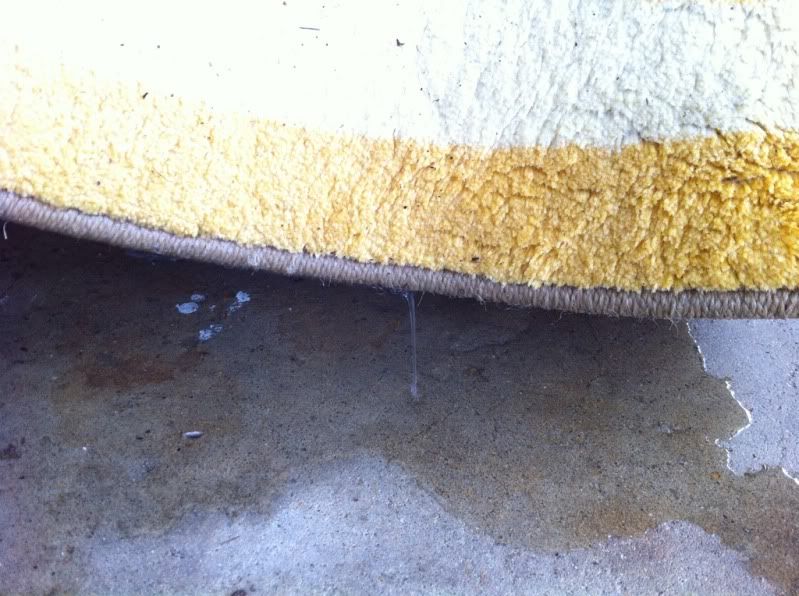
Dry your rug.  This is not as simple as laying it out in the sun!  All that will accomplish is a soured and possibly moldy rug – there is simply too much water soaked into the fibers.  I made that mistake and ended up having to re-wash the rug; after a day and a half, I lifted it off the ground, and water was still pouring out, literally.


I had a steam cleaner at hand, and after a second, de-souring wash, I used it to suction up as much water as possible with 3-4 passes from different directions, then draped it over a cooler and outside table in the sun to finish drying.


After that, within about twelve hours it was still damp, but dry enough that we brought it inside and put a fan on it to finish drying, as it was no worse than after steam cleaning.

Enjoy your rug's second life!


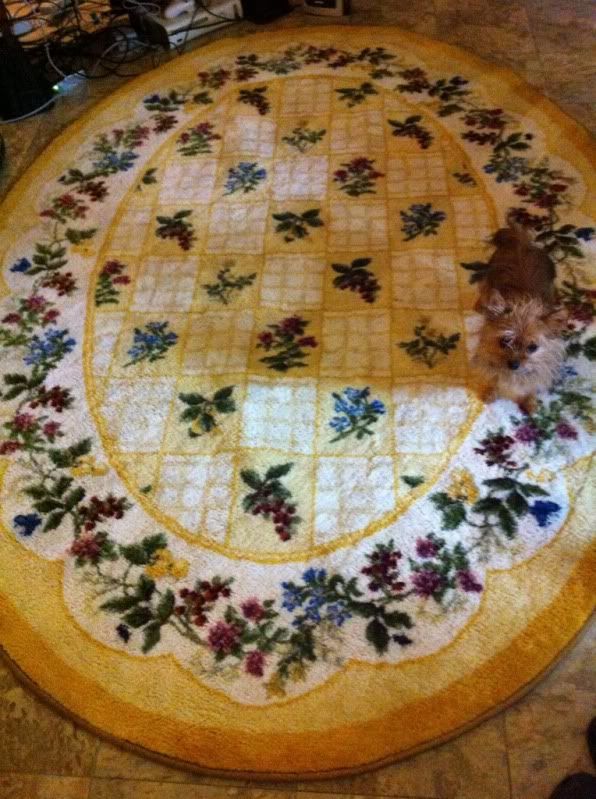
Our Yorkie-Pom, Nyxie, was quite confused by the newly cleaned carpet that no longer smelled 'right'!

Sunday, May 19, 2013

Been Too Long

Okay, it's been much too long since I updated this blog.  I haven't been doing much "real world" crafting; I've been Zazzle designing, gardening, and raising a gorgeous new red Doberman puppy.  However, given how much effort I've been putting into it, I think I will be updating this blog with all my new designs on Zazzle!  And, I will try to get into other crafting again soon, as well.

The last few weeks, I've been working on (a few dozen!) customizable monogram template designs.


I have nifty modern-retro stripes designs from a couple of weeks ago:


Also, I made quite a number of damask-and-stripes designs with a ribbon and monogram seal overlay last week:


And similarly, I am currently working on designs with the same stripes and monogram ribbon and seal, but a floral swirl pattern on top:


And this is just a small selection of the color variants, each of which is available on 70+ items!


View more gifts by Jennie at Zazzle.

Thursday, January 10, 2013

Single Serving Ointment Tubes

This is a fabulous idea that I wish I could take credit for.  It's a bit different than most of my how to's, but it's such a good idea with so many applications, and easily done inside of five minutes, that I felt I had to share it.  I literally went around my house and had everything I needed within about two minutes.

Because this was spur-of-the-moment, I only had a red straw.  It would have been significantly easier if it had been a plain clear straw.


Materials:

Ointment of choice (I used triple antibiotic ointment)
Plastic Straw (clear works best)
Needle Nose Pliers (if you have two pairs, that's even better, but not necessary)
Lighter

Simple, right?


Instructions:

At one end of the straw, squeeze in a portion of ointment.  You will probably end up wasting a bit, so put a little more than you want in your final tube.  I used a little under an inch's worth of straw length.  This is one way in which a clear straw would make things easier; judging how much ointment you are using.

Carefully pinch down the end of the straw to squish the ointment upwards, until you have enough empty space at the bottom for the width of your pliers plus a few millimeters.

Grip tightly with the pliers with the extra extending past them.  Make sure there is no excess ointment below the pliers, as this will interfere with the sealing process.


Using the lighter, carefully heat the end of the straw extending past the pliers until it melts together.  If you have a second pair of pliers, it can be helpful to pinch the melted strip while still hot to form a better seal.

Repeat at other end, either making a 'flat' or 'triangle' tube.  This is the other instance when having a clear straw would make things much easier, as you try to judge where to grip the straw on the other end.


That's it!


I can think of so many uses for these!  Throw a half dozen or so in your first aid kit instead of a full tube, to reduce bulk.  A hiking or car emergency kit.  Keep one or two in your purse or wallet for minor emergencies.  And that's just with the antibiotic ointment!

You can use the same process for sealing honey straws, which makes a fabulous single-serving to add to drinks or just enjoy for a sweet snack.  Single-use packets of lotion.  Bad Hair Day emergency hair gel.  Any fairly thick liquid, ointment, gel, etc. that you use a small portion of at a time is a perfect candidate for this method.  Just remember that if you use this for more than one type of product . . .  write on it what's in the tube!


Saturday, December 29, 2012

Yet another Today's Best Award!

This is now four of my first nine wedding invitation designs to win a Today's Best Award!  And these are all from the first day, I think.  Wow!  Well, I knew they were lovely and I was just delighted with them!

Once again, they chose the item with the broadest appeal/use, the address label.